Showing posts with label Food. Show all posts

Thursday, November 24, 2011

Pumpkin Snickerdoodles

Last but not lease on the pumpkin baking marathon! 

Pumpkin Snickerdoodles! These are super yummy and they go quick at my house with my growing brothers...haha This recipe will make a lot of cookies and I used a big ice cream scoop and cut that in half to make this recipe, and at that it still made a really big cookie!

This makes a really big batch so share them with friends and family! I had enough to share with two families! 


I love baking with spices cause the house starts to smell like the Holidays! Can't wait to bake some sugar cookies! ^_^


Pumpkin Snickerdoodles
Printer-Friendly Version
Yield: about 3-4 dozen cookies  Ingredients:
For the cookies:
3¾ cups all-purpose flour
1½ tsp. baking powder
½ tsp. salt
½ tsp. ground cinnamon
¼ tsp. ground nutmeg
1 cup (2 sticks) unsalted butter, at room temperature
1 cup granulated sugar
½ cup light brown sugar
¾ cup pumpkin puree
1 large egg
2 tsp. vanilla extract

For the coating:
½ cup granulated sugar
1 tsp. ground cinnamon
½ tsp. ground ginger
Dash of allspice

Directions:
In a medium bowl, combine the flour, baking powder, salt, cinnamon, and nutmeg.  Whisk to blend and set aside.  In the bowl of an electric mixer, beat together the butter and sugars on medium-high speed until light and fluffy, 2-3 minutes.  Blend in the pumpkin puree.  Beat in the egg and vanilla until incorporated.  With the mixer on low speed add in the dry ingredients and mix just until incorporated.  Cover and chill the dough for at least 1 hour.

Preheat the oven to 350˚ F.  Line baking sheets with silicone baking mats or parchment paper.  Combine the sugar and spices for the coating in a bowl and mix to blend.  Scoop the dough (about 2½ tablespoons) and roll into a ball.  Coat the dough ball in the sugar-spice mixture and place on the prepared baking sheet.  Repeat with the remaining dough to fill the sheets, spacing the dough balls 2-3 inches apart.  Dip the bottom of a flat, heavy-bottomed drinking glass in water, then in the sugar-spice mixture, and use the bottom to flatten the dough balls slightly. Recoat the bottom of the glass in the sugar-spice mixture as needed.

Bake the cookies for 10-12 minutes, or until just set and baked through.  Let cool on the baking sheets about 5 minutes, then transfer to a wire rack to cool completely.  Repeat with the remaining dough.  Store in an airtight container.

Source: you can find this on Annies Eats

Enjoy!

Dairy-Free, Soy-Free Pumpkin Pie

My boyfriend is lactose intolerance and he also loves pumpkin pie so you know I had to go on a hunt and find my boy a dairy free pumpkin pie. Well it didn't take me long to find one! ^_~

I didn't want to to post this until he had a piece or two. So far so good he didn't feel sick while eating this so he had another piece...lol I did make this with eggs which he is allergic too, but I only used the whites not yolks. He doesn't seem to get sick when eating the egg whites plus he takes his lactose pills before eating anything with dairy in it.

Anyways I also had a piece and it was very delicious! He tells me that it was a little sweeter than the regular way I bake pumpkin pie but he didn't get sick and it didn't feel so heavy on the stomach.


I didn't have time to make my own pie crust this year, so I bought the frozen pie crust.

Dairy-Free, Soy-Free Pumpkin Pie

1/2 Cup Brown Sugar, firmly packed
1/4 Cup White Sugar
1 Teaspoon Ground Cinnamon
1/2 Teaspoon Ground Ginger
1/4 Teaspoon Ground Nutmeg or Allspice
1/4 Teaspoon Ground Cloves
1/2 Teaspoon Salt
2 Large Eggs
1 15-ounce Can Pumpkin Puree
1 Teaspoon Vanilla Extract
1 Cup Regular Coconut Milk
1 Unbaked Pie Shell 

Preheat your oven to 425ºF.

Combine the sugars, cinnamon, ginger, nutmeg or allspice, cloves and salt in a small bowl. In a large bowl, beat the eggs. Beat in the sugar mixture, pumpkin, and vanilla until smooth. Fold in the coconut milk.

Pour the filling into the unbaked pie crust and bake for 15 minutes. Reduce the temperature to 350ºF and continue to bake for 50 to 60 minutes, or until a knife inserted comes out clean.  It may be a bit wobbly still, but it will firm-up as it cools.

Allow the pie to cool on a wire rack for 2 hours (Be patient! This is important).  Serve or refrigerate until ready to serve

Source:godairyfree.org


Enjoy!

Pumpkin Flan

Happy Thanksgiving to my readers!

I have to say I was looking forward to Thanksgiving desserts this year. I love Flan so when I saw this recipe online I just had to make it. I was glad I had some left over pumpkin puree to make some cookies afterwards! ^_~

If you don't like pumpkin, you can make it without it or add anything else you might like! The only thing I think I did wrong was set the temperature too high in the oven, next time I know to set it lower.

But besides that this was very yummy and super creamy. The caramel sauce tops it off!


Pumpkin Flan

Ingredients:
1 1/4 cups granulated sugar, divided
1/4 cup water
1 12-ounce can evaporated milk
1 14-ounce can sweetened condensed milk
6 ounces cream cheese, softened
1 cup pumpkin puree
5 eggs
1 tablespoon cornstarch
1/2 teaspoon ground cinnamon
1/4 teaspoon ground cloves
1/4 teaspoon ground ginger
2 teaspoons vanilla extract
Boiling water


Directions:
Preheat oven to 300 degrees F.

For the Caramel:
Combine 1 cup sugar and water in medium, deep, heavy saucepan. Cook over medium heat, stirring constantly, until sugar is dissolved, about 2-3 minutes.  Increase heat to medium-high, and boil, without stirring, until caramel turns a copper brown color, anywhere from about 10-15 minutes.
Using oven mitts, quickly and carefully pour the caramel over bottom and sides of a 10-inch metal pie plate or a flan mold.  That caramel will be screaming hot!

For the custard:
Combine the evaporated milk, sweetened condensed milk, cream cheese, pumpkin puree, 1/4 cup sugar, eggs, cornstarch,  spices and vanilla in a blender. Blend until smooth.
Strain custard mixture through a sieve over the caramel, into the pie plate or mold.  Arrange in a large roasting pan lined with a clean dish towel.

Pour boiling water into the roasting pan until it comes about halfway up the side of your flan vessel.  Bake for 50-60 minutes or until knife inserted near center comes out clean. The center of the flan should still jiggle a little when nudged.  Cool for about 30 minutes.  Chill in the fridge for several hours or overnight.

To unmold, run a sharp knife around the rim of the mold and gently shake to loosen. Invert onto a serving plate. 

Source: Sticky Gooey Creamy Chewy's Blog!

Enjoy!

Wednesday, November 23, 2011

Preview To Thanksgiving Sweets!

Sorry I haven't been posting lately, just had a lost in my family, but don't worry cause I'm back and here's a sneak peek to tomorrow's blog post!


 That's all you get! lol Every recipe will be up tomorrow! So stay tune!

Liz
xo

Thursday, November 10, 2011

Pumpkin Bread

When I think of Autumn I think of the smell of cinnamon and spices. The aroma of this recipe is so heavenly, your house will definitely smell like the holidays!


This pumpkin bread is a good to serve with dinner, or for breakfast with any type of spread you would prefer. It's more of a bread texture than a cake, but it taste good none the less!


By adding the raisins in boiling water it plumps them up and makes them soft to the taste. If you don't like raisins you don't have to add them or you can also add cranberry or anything any type of berry, fruit, and or nuts.

Recipe below enjoy!

Liz
xo

Pumpkin Bread
makes 2 loaves

½ cup raisins
1 ½ cups all-purpose flour
1 ¼ cups whole wheat flour
½ teaspoon salt
1 teaspoon baking powder
¾ teaspoon baking soda
½ teaspoon ground cinnamon
¼ teaspoon ground nutmeg
1/8 teaspoon ground cloves
1 cup pureed cooked pumpkin (fresh, canned, or frozen)
¾ cup sugar
2 eggs
½ cup vegetable oil

1. Preheat the oven to 375 F. Plump the raisins by pouring the boiling water over them, letting them rest for about 10 minutes, then draining. Grease and flour two 9-inch loaf pans.

2. Sift together the all-purpose flour, whole wheat flour, salt, baking powder, baking soda, cinnamon, nutmeg, and cloves. In another bowl combine the raisins, pumpkin, sugar, eggs, and oil and mix well. Stir the dry ingredients into the pumpkin mixture all at once, and mix just until the dry ingredients are blended into the batter.

3. Transfer the batter into the prepared loaf pans and bake for 50 to 55 minutes. Let the breads cool in the pans for 10 to 15 minutes. Ease them out of the pans and continue cooling on a rack.


Monday, November 7, 2011

Chewy Chocolate Chip Cookies

I was on a hunt for the best Chewy Chocolate Chip Cookie recipe, and I think I've found one!


I'm not really into baking crispy cookies, unless it ginger snaps, but I've noticed a lot of the chocolate chip cookie recipes I've been baking were coming out a bit crispier then I wanted. I don't know if it was the recipe, cookie sheet or oven, but I was looking for a recipe that made them really soft and chewy. Well I think I've found the best recipe by far! This recipe tells you you add cornstarch, which adds volume and makes the cookies more chewy and soft.

Super yummy recipe! I think I've made this cookie recipe three times now and every time I do there gone so fast!

I got this recipe from Apple A Day blog. Check it out also I will post the recipe below!

Enjoy!


Best-Ever Chocolate Chip Cookies

Ingredients: 
3/4 c. unsalted butter, softened 
3/4 c. brown sugar 
1/4 c. granulated sugar 
1 egg 
2 tsp. vanilla extract 
2 c. all purpose flour 
2 tsp. cornstarch 
1 tsp. baking soda 
1/2 tsp. salt 
1 c. bittersweet chocolate chips

Directions:
1.  Preheat oven to 350 degrees F.

2.  In the bowl of a stand mixer fitted with a paddle attachment, cream together butter and sugars until fluffy and light in color. Add egg and vanilla and blend in.

3.  Mix in flour, cornstarch, baking soda and salt. Stir in chocolate chunks.

4.  Using a standard-sized cookie scoop or tablespoon, drop dough onto a prepared baking sheet.  Bake for 8-10 minutes, until barely golden brown around the edges.  (The tops will not brown, but do NOT cook longer than ten minutes.)

5.  Let cool, on the sheet, on a wire rack for five minutes.  Remove from baking sheet and let cool completely.  Try not to eat them all.

barely adapted from Anna Olson, Food Network Canada
 

Friday, October 7, 2011

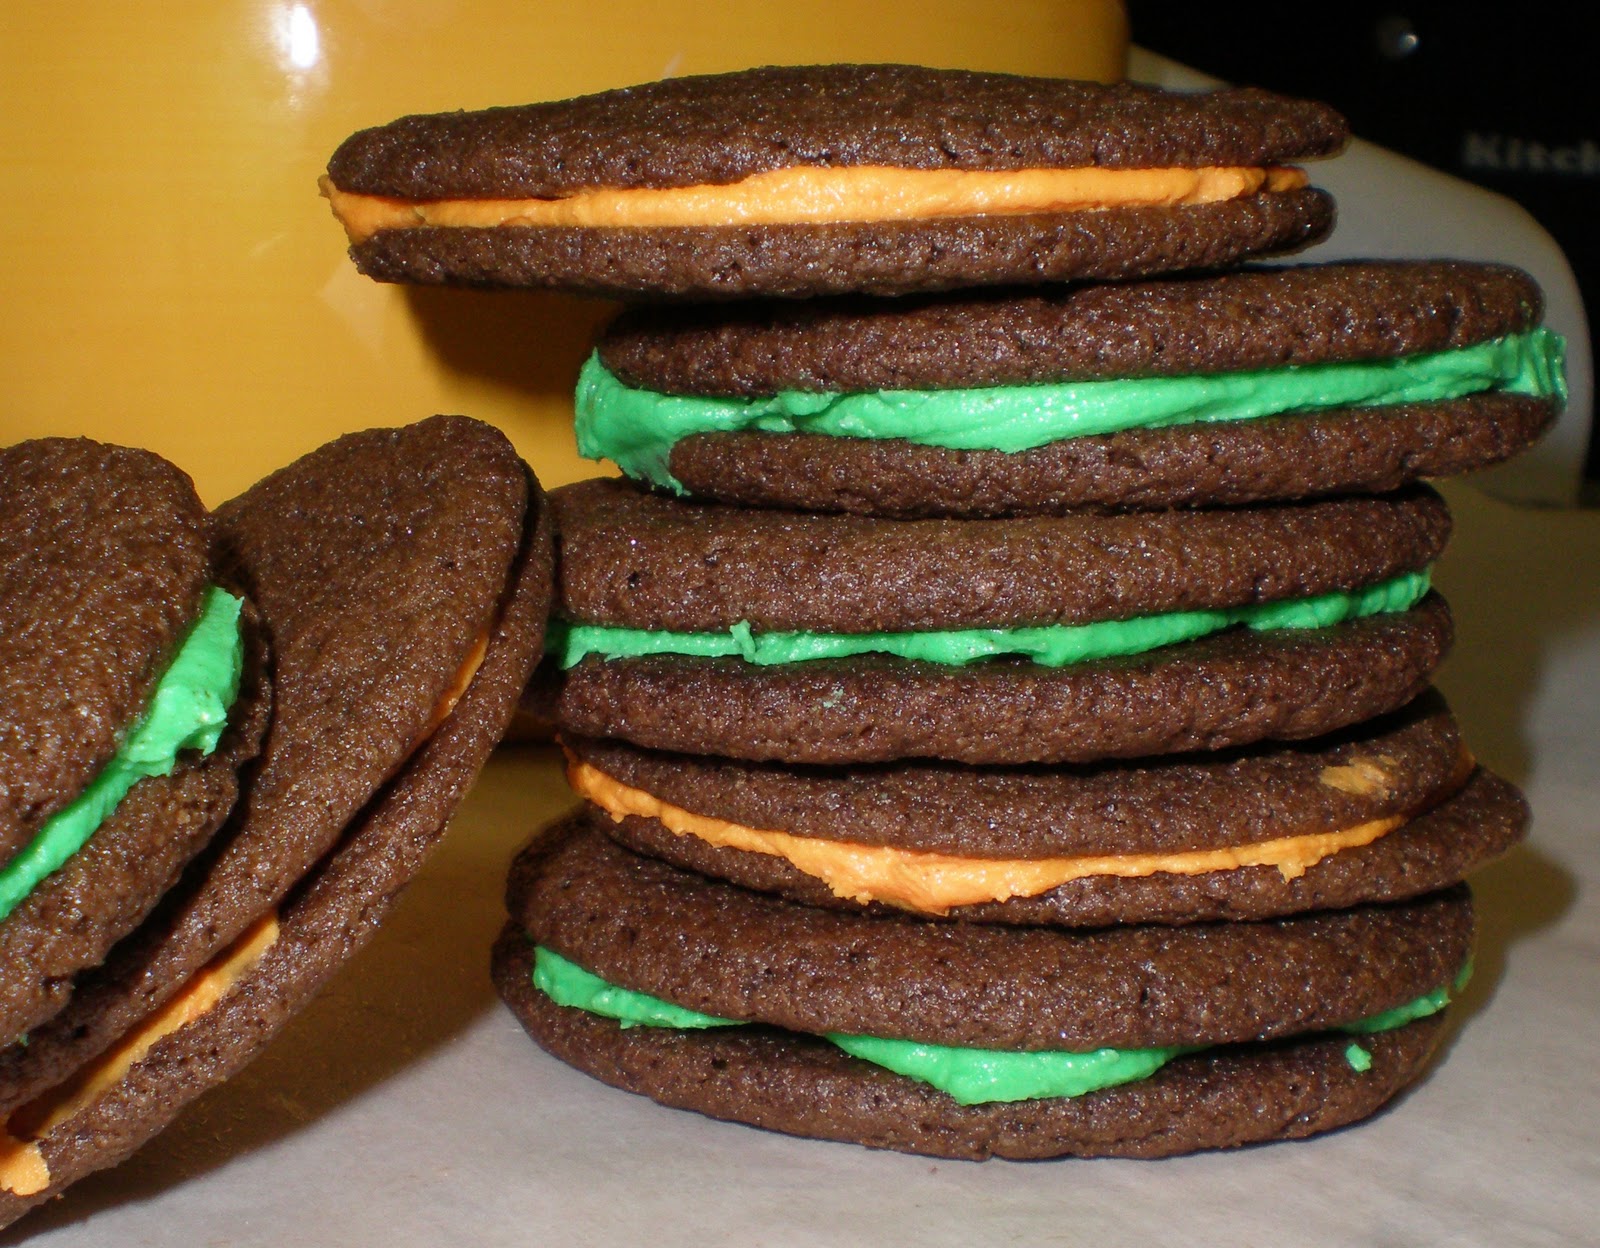
Homemade Halloween Oreo Cookies


Since it's October, I thought it was just about time for me to get started on Halloween treats!

I've been looking at food blogs a lot and came a cross this easy to follow recipe. Made it last night and thought they were really yummy. There such cute cookies specially if you have kids or are going to any Halloween parties. This would be a great recipe for that!

To make them even more prefect for Halloween I divided the cream filling and added green and orange food coloring. You can add any other colors you may like for instances purple or red would be great too. Any thing that screams Halloween! Recipe below!


Enjoy!
Liz
xo

Homemade Halloween Oreo Cookies

Ingredients:
For the cookies:
  • 1 1/4 cups all-purpose flour
  • 1/2 cup unsweetened or Dutch process cocoa powder
  • 1 tsp baking soda
  • 1/4 tsp baking powder
  • 1/4 tsp salt
  • 1 to 1 1/2 cups sugar (Use 1 cup for a truer-to-original Oreo wafer or more sugar for a sweeter chocolate cookie)
  • 10 tbsp (1 stick + 2 tbsp) unsalted butter, at room temperature
  • 1 large egg
For the cream filling (white):
  • 4 tbsp (1/2 stick) unsalted butter, at room temperature
  • 1/4 cup vegetable shortening
  • 2 cups confectioners’ sugar, sifted
  • 2 tsp vanilla extract
Instructions:
  1. Preheat the oven to 375˚ F.  Line two baking sheets with silicone baking mats or parchment paper.
  2. In a food processor or the bowl of an electric mixer, combine the flour, cocoa powder, baking soda, baking powder, salt, and sugar.  Mix briefly to combine.  Add the butter to the bowl and pulse or mix briefly to incorporate.  Add in the egg and mix until the dough forms a cohesive mass.
  3. Scoop between 2 tsp to a scant tbsp of batter (depending on how large you want them) onto the baking sheet.  Continue scooping, spacing the dough balls a couple of inches apart.  With moistened fingers, gently press down on the dough balls to flatten slightly.  Bake for 9-11 minutes (closer to 9 minutes for smaller cookies), rotating the pans halfway through baking.  Transfer the baking sheets to a wire rack and let cool completely until the cookies are firm and set.  Be sure the cookies are completely cooled before filling.
  4. To make the filling, combine the butter and shortening in the bowl of an electric mixer.  Beat on medium-high speed until smooth.  Add the confectioners’ sugar to the bowl and mix on low speed just until incorporated, then increase the speed to medium-high and beat until light and fluffy, about 2-3 minutes.  Blend in the vanilla extract.
  5. To assemble the cookies, pair them up by size.  Use a pastry bag fitted with a plain round tip to pipe a swirl of filling onto the flat side of one cookie of each pair.  Sandwich together with the remaining cookie and press down so that the filling reaches the edges.
Yield: 20 to 30 sandwich cookies, depending on the size

Source: Retro Desserts by Wayne Bachman

Saturday, September 17, 2011

Banana Bread


What I had for breakfast!

I found this great recipe on Banana Bread online, so I just had to bake it! I got this recipe from Annie Eats Blog. I really love her blog cause she makes such great eats!


It's a pretty easy recipe to follow. You don't need to use a mixer at all, just a whisk or a spatula. It came out super moist and super yummy! The slice bananas on the edges makes the bread look even more delicious! 


Once I took it out the oven and let it sit for a while, I dig right in! I love it when the bread is still warm from the oven. If you bake this, your house will smell like bananas! ^_^


Recipe Below!

Enjoy!

Liz
xo

Banana Bread
Printer-Friendly Version
Ingredients:
1¾ cups all-purpose flour
1 tsp. baking soda
½ tsp. salt
6 large, very ripe bananas (about 2¼ lbs.), peeled
8 tbsp. unsalted butter, melted and cooled slightly
2 large eggs
¾ cup packed light brown sugar
1 tsp. vanilla extract
2 tsp. granulated sugar

Directions:
Preheat the oven to 350˚ F.  Lightly spray a loaf pan (about 9 x 5 inches) with cooking spray.  In a medium bowl, combine the flour, baking soda and salt; whisk together and set aside.

Place 5 bananas in a microwave safe bowl; cover with plastic wrap and make several slits in the wrap to act as steam vents.  Microwave on high until the bananas are soft and have released liquid, about 5 minutes.  Transfer the bananas to a fine mesh strainer set over a medium bowl and let drain, stirring occasionally, about 15 minutes (you should have ½-¾ cup liquid).

Transfer the reserved banana liquid to a medium saucepan over medium-high heat.  Cook until reduced to about ¼ cup, 5-10 minutes.  Remove the pan from the heat.  In a large bowl, combine the bananas and the reduced banana liquid.  Mash with a potato masher or whisk until fairly smooth.  Whisk in the melted butter, eggs, brown sugar and vanilla.  Add the dry ingredients to the bowl with the banana mixture.  Fold together gently, just until all of the dry ingredients are incorporated.  Pour the batter into the prepared pan and smooth with a spatula.

Slice the remaining banana diagonally into ¼-inch thick slices.  Layer the banana slices along both sides of the top of the batter, leaving a couple of inches in the center to allow an even rise.  Sprinkle the sugar evenly over the assembled loaf.

Bake until a toothpick inserted in the center comes out clean, 55-75 minutes.  Transfer to a wire rack and allow to cool at least 15 minutes in the pan before removing.  Continue to cool and serve warm or at room temperature.

This recipe is from Cooks Illustrated

Tuesday, June 28, 2011

Chocolate Almond Cake

Who doesn't like chocolate? I know I love chocolate. Specially Chocolate Cake!

It was my dad's Birthday last Sunday and I made him this cake. (picture below) I found this recipe on Annie Eats blog. Once I saw the pic on her blog I knew I had to bake this cake for him. My dad loves chocolate, so I knew he would love this cake! I didn't really read her blog entry on this recipe, I was just too excited to bake this thing. I did go back and read it the next day.

I have to say while preparing this cake everything went well. Once I got it in the oven that's when I started to noticed it was taking it's sweet time baking. The directions for baking time is 50-60 minutes. After checking it after 30 minutes I noticed it was still wet and wobbly in the center. So I check it every 10 minutes, it was still wet in the center and I knew the cake was baking way too long. I don't know if it was my bundt pan or something but when I went to cut a slice I noticed it started to crumble. I knew it was baked way too long, but it just wasn't done in the center.

I have to say this isn't my first fail it happens all the time. So I try not to get too bummed out. All in all the cake was pretty good. Everyone who had a piece loved it. So I wasn't too sad about that. I will be getting a better bundt cake pan. The one I baked it in was pretty cheap, but I have to use what I have!

Anyways I'll leave you guys drooling over this cake!


This is another chocolate cake I made from the Hershey's Unsweetened Cocoa Powder Recipe. Easy and simple, and taste Delicious!


This is Annies Eats Blog. (link below) You should visit it, she has some great recipes for just about anything!

http://annies-eats.net/2010/12/03/chocolate-almond-cake/

~Liz


Friday, May 6, 2011

Mom's Birthday Cake!

What can be better than Makeup? 

CAKE that is! lol

So my mom's Birthday was on the 4th of May and I made her this delicious Coconut Cake with Pineapple Filling. This cake took me about 3 hours to prepare. I was so exhausted but in the end it was so worth it! 

This cake was so good and moist that it was gone so quick. My sister thought it was from a Bakery. It actually did taste like it was from the Bakery. This recipe calls for a Lemon Curd Filling but since my mom doesn't like lemon so much, she asked me to make it with pineapple instead. So I found a recipe for a pineapple filling and made it with that. The pineapple goes so well with the coconut in this cake. I bet the lemon curd would also taste really well. The frosting was really good too. Kinda tasted like marshmallows...hmmm Wish I had a piece right now...lol

I got this cake recipe from joyofbaking.com. I found a Pineapple Filling Recipe on allrecipes.com. I will add the links below. 

The cake isn't all that fancy cause of the shredded coconut on top. I'll leave you with the deliciousness of this cake! 


Coconut Cake
About half gone!

Totally forgot to take a pic, can't you tell?
Coconut Cake Recipe
http://www.joyofbaking.com/CoconutCake.html

Pineapple Filling Recipe
http://allrecipes.com//Recipe/pineapple-filling/Detail.aspx

Tuesday, December 21, 2010

Chocolate Overdose Cake!

I made a chocolate cake for my birthday a few days back. The title is actually the name of the cake...lol Thought I should share with you chocolate lovers out there what goodness and joy this cake will bring. This is a great cake to make for the holidays, everyone will love it, chocolate lovers that is. When I ate a slice of this cake, I thought I died and gone to chocolate heaven! haha It has 3 layers of goodness. 

First layer (bottom) starts with a Brownie recipe. Second (middle) Chocolate Mousse. Third (top) Chocolate Cake! And the finishing topping is Chocolate Ganache!!! 

That's all I have to say, The pictures will speak for them selves! 
Yummy goodness in every slice!
Thanks for Reading!
Got the recipe from Annie Eats Blog.
http://annies-eats.com/2009/04/03/chocolate-overdose-cake/

Thursday, December 2, 2010

Late Thanksgiving Post!

This is a late Thanksgiving post. Hope you guys had a wonderful dinner with your love ones. I had a good time with family and friends. I wanted to share some pics of the desserts that I made for Thanksgiving and also my makeup look for that day.

For Thanksgiving I made Pumpkin Cheese Cake, Pumpkin Bread and Brownies. They were all so yummy, everyone enjoyed them!

Brownies

Pumpkin Bread
                             
Pumpkin Cheese Cake

                             
Here are some pics of the eye look I did for that day! I used 3 of the Coastal Scents 88 palettes. Ultra Shimmer, Metal Mania and the Warm palette. Used golds, plums and browns.

 
Thanks for reading and I will be posting the recipes soon!


Happy Holidays! ^.^

Sunday, October 31, 2010

If You Love Pumpkin...

Then you'll love this recipe! 

For Halloween I made Iced Pumpkin Cookies. I got this recipe online. Wonderfully, delicious pumpkin cookies I've tried by far! I love pumpkin but I think my boyfriend loves pumpkin more then me...lol He looks forward to this time of the year because around this time I would come up with all kinds of pumpkin recipes. He mainly loves pumpkin pie. So when I bake a pie I would have to bake two, cause he would devour a whole pie...lol He's a pumpkin hog!  


Anyways here some pics.
God there so good, I'm about to eat some more. But I will not leave you guys without this recipe. So here it is!


http://allrecipes.com/Recipe/Iced-Pumpkin-Cookies/Detail.aspx

Thanks for reading & please do let me know how you enjoy this recipe!

Wednesday, September 2, 2009

My other passion in life other than makeup!

I thought I would share some of the desserts I made so far. Most of these were made from scratch. I hope you enjoy and if you like any of them I will try to find some of these recipes...I always have them all over the place...lol

Sugar Cookies

Pumpkin Pie
Peanut Butter Cookies
Mudslides
Strawberry and Vanilla Frosted Cake
Brownie and Shortbread w/ Whip Cream
Chocolate Macaroons
Coconut Macaroons
Coconut Cream Cheese Cake
Chocolate Chunk Cookies
Christmas Cookies
Chocolate Chip Cookies
Chocolate Cake
Carrot Cake w/ Cream Cheese Frosting


Mmm...now I'm hungry...lol

Notice how almost all of the dessert starts with the letter C! lol

Leave me some comments, I wanna know what you guys think!

Related Posts Plugin for WordPress, Blogger...